Choosing the right geological hammer is crucial for anyone involved in geology, fossil hunting, or serious rockhounding. It's more than just a hammer; it's a specialized tool designed for specific tasks like breaking rocks, splitting layers of rock, and extracting samples or fossils. This article, drawing on my experience as Allen from a leading hammer and axe factory in China, will guide you through the types of geological hammers, their uses, how to choose the right one (considering factors like hammer weight and design), and why using the correct hammer is essential for both safety and effectiveness. We'll explore the differences between a rock pick and a chisel end hammer, discuss materials, and offer insights valuable for hobbyists and professionals alike, including procurement officers like Mark Thompson who value quality and reliability. Understanding your hammer is the first step towards successful fieldwork.
What Exactly is a Geological Hammer and Why is it Essential?
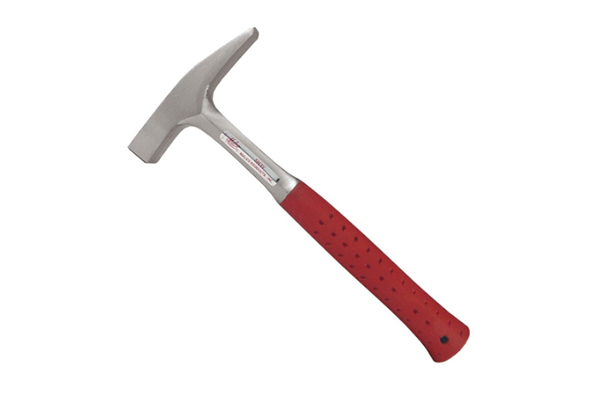
A geological hammer, often called a rock hammer or geologist's hammer, is a fundamental piece of equipment for anyone studying or working with rocks, minerals, and fossils. Unlike household hammers like the claw hammer, this tool is specifically designed for geological fieldwork. Its primary functions include breaking rocks open to reveal fresh surfaces for examination, splitting rocks along bedding planes or fractures, trimming specimens to a manageable size, and extracting fossils or minerals from their matrix. The typical geological hammer features a hardened steel head with two distinct ends: one flat face for general striking and breaking, and the other either a pointed tip (rock pick) or a flat chisel edge.
The necessity of a proper geological hammer stems from the unique demands of fieldwork. Rocks can be incredibly hard, and using an inappropriate hammer (like a standard claw hammer or even a masonry hammer) can be dangerous and ineffective. Regular hammers are not designed to withstand the repeated high-impact forces involved in breaking rocks and may chip, shatter, or deform, sending potentially harmful metal fragments flying. A geological hammer is typically made from a single piece of forged steel (head and often part of the handle) for maximum strength and durability, ensuring it can handle the stress. The specific design allows for precision work, whether you need to delicately chip away matrix from a delicate fossil or deliver a forceful blow to split a larger rock. For any serious geologist or rock enthusiast, the geological hammer is indispensable.
As a manufacturer, we understand that the integrity of the hammer is paramount. We utilize high-carbon forged steel and rigorous testing to ensure our geological hammers meet the demands of the field. Our clients, ranging from educational institutions to exploration companies and retailers supplying customers like Mark Thompson, rely on this durability. The right hammer isn't just about function; it's about safety and long-term value. Using the correct geological hammer prevents tool failure and potential injury, making it an essential investment.
Rock Hammer vs. Rock Pick: Are They the Same Thing?
While the terms "rock hammer" and "rock pick" are often used interchangeably, there's technically a nuance, primarily relating to the shape of one end of the hammer head. Both fall under the umbrella of geological hammers. The defining difference lies in the non-flat end of the hammer head. A rock pick specifically refers to a geological hammer that features a pointed tip, often called a pick end or sharp point. This pointed pick is excellent for probing cracks and crevices, prying apart layers of rock, digging into softer materials, and extracting specimens from tight spots. It concentrates force on a small area, making it effective for investigating specific features on rock faces.
Conversely, the term "rock hammer" can be a broader category encompassing both the pick end type and the chisel end type. Some might use "rock hammer" specifically to refer to the chisel end version, which features a flat, horizontal chisel edge instead of a pointed tip. So, while every rock pick is a type of rock hammer (and a geological hammer), not every rock hammer is necessarily a rock pick. Think of it like squares and rectangles: all squares are rectangles, but not all rectangles are squares. The geological pick style is arguably the most iconic geologist's hammer.
In practical terms, most geologists and enthusiasts select the hammer type based on the expected rock types and tasks. The rock pick (hammer with a pointed end) is often favored for hard igneous and metamorphic rocks where prying and probing are common needs. The chisel end hammer (bricklayer's hammer style) is preferred for sedimentary rocks like shale or sandstone, where splitting along bedding planes is a primary activity. Regardless of the specific type, the core function as a specialized geological hammer remains the same: to safely and effectively interact with rocks and minerals in the field. We manufacture both types, understanding that the choice often comes down to the specific application and user preference.
Pointed Tip vs. Chisel End: Which Geological Hammer is Right for Your Task?
Choosing between a geological hammer with a pointed tip (a rock pick) and one with a chisel end depends heavily on the type of rocks you'll primarily encounter and the tasks you need to perform. The pointed tip is designed to concentrate force onto a very small area. This makes the pick hammer excellent for several tasks: investigating small cracks and fissures, prying apart weathered or fractured rock faces, digging into softer sediments or soil to extract samples, and creating a starting point for a chisel or wedge. For hard, crystalline rocks (igneous like granite, or metamorphic like gneiss), the pointed pick is often the preferred tool for initial investigation and extracting crystals or specific mineral samples. Popular models like the Estwing e3-22p or e3-14p exemplify this design.
The chisel end geological hammer, sometimes resembling a bricklayer's hammer or masonry hammer in head shape but built to geological standards, offers a different set of advantages. The flat chisel edge is ideal for splitting rocks along existing planes of weakness, such as bedding planes in sedimentary rocks (shale, sandstone, limestone) or foliation in metamorphic rocks. It's particularly effective for collecting flat specimens or extracting layered fossils, including delicate plant fossils. You can use the chisel end to chip away layers or drive it into a crack (sometimes started with the pointed tip of another hammer or a separate chisel) to wedge the rock apart. The Estwing e6-22blc or e3-23lp (long handle pick) often represent variations catering to different needs, but the chisel edge provides broad utility for splitting rock.
Ultimately, the choice isn't always mutually exclusive. Some geologists carry both types, or a rock pick and a separate chisel set with a club hammer or sledge hammer for heavier work. If you primarily work with sedimentary rocks and fossils, the chisel is better. If you deal mostly with hard rocks or need digging/prying capability, the pointed tip (estwing pointed end) is generally more useful. As manufacturers, we offer both designs because we know geologists need the right tool for the job. Consider the geology of your typical field area when deciding which hammer configuration best suits your needs. Remember, using the hammer correctly involves selecting the right end for the task at hand.
How Crucial is Hammer Weight in Geological Work?
The hammer weight, specifically the head weight, is a critical factor when selecting a geological hammer. It directly influences both the tool's effectiveness and user fatigue during fieldwork. Geological hammers typically range in head weight from around 11 oz (rarely used) up to 22 oz or even 24 oz for standard rock hammers and rock picks. Heavier hammers, like small sledge hammers (e.g., 3 lb or 4 lb club hammer types), are used for breaking very large or resistant rocks, often in conjunction with a chisel or wedge. Choosing the right weight involves balancing striking power with portability and ease of use over extended periods.
Lighter hammers (around 13-16 oz, like the Estwing e3-14p) are easier to carry and swing repeatedly, reducing fatigue. They are suitable for softer rocks, detailed chisel work, trimming small specimens, and situations where precision is more important than brute force. However, they lack the momentum needed to effectively break rocks that are harder or larger. A geologist using a lighter hammer on tough rock might find themselves delivering many ineffective blows, which can be tiring and frustrating.
Heavier hammers (typically 22 oz, like the popular Estwing e3-22p or e3-23lp) provide significantly more striking power. A 22-ounce hammer can make quick work of moderately hard rocks and is a good all-around choice for general geological fieldwork. The increased head weight delivers more force per swing, making it easier to split or break rocks with fewer blows. However, heavier hammers can lead to faster fatigue, especially during long field sessions or when working overhead. For tasks requiring significant breaking power, moving up to a 3 lb or 4 lb sledge hammer (often called a crack hammer or club hammer in this context) used with a chisel might be necessary, but these are less portable and not used for general prospecting. The choice often comes down to the type of rock encountered and personal preference/physical condition. Many experienced geologists favor the 22 oz hammer as a versatile compromise.
What Materials Make the Best Geological Hammer? (Forged Steel Explained)
The material and construction of a geological hammer are paramount to its performance, durability, and safety. The overwhelming standard for high-quality geological hammers is forged steel, specifically high-carbon steel. Forging is a manufacturing process where metal is shaped using localized compressive forces, often delivered by a hammer or press. Unlike casting (pouring molten metal into a mold), forging aligns the steel's grain structure, resulting in exceptional strength, toughness, and resistance to impact and fatigue. This is absolutely critical for a tool designed to strike hard rock surfaces repeatedly. A hammer made of steel that is merely cast would be far more brittle and prone to catastrophic failure.
Most reputable geological hammers, including many Estwing models, feature a head and handle forged from a single piece of steel. This made from a single piece construction eliminates the weakest point in many traditional tools: the joint between the head and handle. There's no wedge or epoxy to fail, ensuring the head cannot fly off during use – a significant safety hazard. This unibody steel construction provides maximum strength and durability, allowing the hammer to withstand the rigors of breaking rocks and prying. The striking faces (flat face and chisel or pointed end) are typically hardened to a greater degree than the body of the hammer to resist chipping and deformation, while the body retains some ductility to absorb shock.
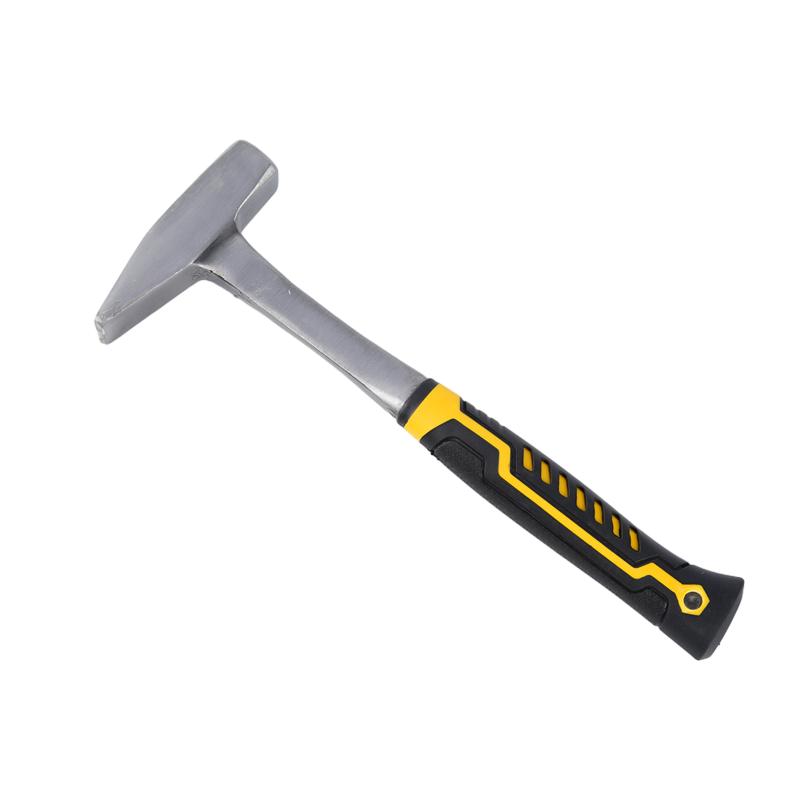
While the head is always steel, handles vary. Full steel construction offers maximum durability. However, some users prefer handles with integrated shock absorption systems, like Estwing's famous blue nylon-vinyl grip, which significantly reduces impact vibrations transferred to the user's arm. Other options include fiberglass handles (known for strength and shock absorption) or traditional wooden handle options (like hickory, prized for its feel but requiring more maintenance and potentially less durable than steel or fiberglass). As a factory, we prioritize forged steel heads for all our geological hammers. While we offer various handle configurations to meet diverse customer preferences (like Mark Thompson's focus on both quality and cost-effectiveness), the core integrity provided by a properly forged and heat-treated steel head is non-negotiable for a reliable geological hammer. This commitment to quality materials is crucial for meeting international safety standards and ensuring customer satisfaction.
Beyond the Basics: Understanding Estwing Hammer Models (e.g., e3-22p, e3-23lp)
Estwing is arguably the most recognized brand name in geological hammers, and understanding their model numbers can help clarify common features and choices. While we manufacture high-quality alternatives, studying Estwing models provides a useful benchmark. The model numbers often encode key information about the hammer type, weight, and handle. For example, let's look at two popular models: the Estwing e3-22p and the e3-23lp.
The "e3" prefix often indicates Estwing's standard line featuring the iconic one-piece forged steel construction with the shock-reduction grip. The number following, like "22" in e3-22p, typically refers to the nominal head weight in ounces – so, a 22 oz hammer. This is a very common and versatile weight for general geology. The letter "P" at the end usually stands for "Pick" or "Pointed", indicating it's a rock pick style hammer with a pointed tip. Therefore, the Estwing e3-22p is a classic 22-ounce geological hammer with a pointed pick end. Another example is the e3-14p, a lighter 14 oz version.
Now consider the Estwing e3-23lp. Here, "23" might seem confusing if thinking strictly of head weight, but it often relates to the overall tool class or a slightly different balance/design, though still generally in the heavier standard range (often compared to the 22 oz class). The key difference is the "LP", which stands for "Long Pick" or possibly "Long Handle, Pick End". This hammer variant usually features a longer handle (increasing overall length) compared to the standard e3-22p. A longer handle provides greater leverage and striking velocity, potentially making it easier to break rocks with more force, but it can sometimes be less convenient in confined spaces. Similarly, you might see models like the e6-22blc, where "BLC" could indicate "BrickLayer Chisel", signifying a chisel-end hammer. Understanding these conventions helps users choose the specific Estwing hammer (or a comparable model from another manufacturer like us) that best fits their needs regarding weight, end type (pointed tip vs. chisel tip), and handle length.
Can I Use a Regular Claw Hammer or Sledge Hammer for Geology?
It is strongly discouraged, and often dangerous, to use a standard claw hammer for geological work like breaking rocks. Claw hammers are designed for driving and removing nails in woodworking. Their heads are typically hardened differently than geological hammers and are not intended to strike hard stone. The face can chip or shatter, sending sharp metal fragments flying at high speed, posing a serious risk of injury, especially to the eyes. Furthermore, the claw end is designed for pulling nails and lacks the structural integrity for effective prying of rock; it can easily bend or break. Using a claw hammer for geology is ineffective and unsafe. Never use a hammer designed for one purpose for a drastically different, high-impact task it wasn't built for.
Using a sledge hammer or a club hammer (like a 3 lb or heavier hammer) can be appropriate for certain geological tasks, but only in specific ways and usually not as a primary prospecting tool. Heavy sledge hammers are used for demolition-type work – breaking very large rock masses or driving large chisels or wedges. A geologist might use a 3 lb or 4 lb sledge (sometimes called a crack hammer) in combination with a hardened steel chisel or wedge for controlled splitting of resistant rock. You strike the chisel with the sledge hammer, not the rock directly (unless reducing a very large boulder). However, a sledge hammer lacks the precision and specific features (like a pick end or chisel end) of a geological hammer for general fieldwork, sample trimming, or fossil extraction.
The bottom line is that specialized tools exist for a reason. A geological hammer (rock hammer or rock pick) is specifically engineered for the stresses and tasks involved in fieldwork with rocks and minerals. Its forged steel construction, appropriate head design (pointed tip or chisel), and often integrated shock absorption make it the right – and safest – tool for the job. While a sledge hammer has its place for heavy-duty breaking with a chisel, a claw hammer should never be substituted for a proper geological hammer. Investing in the correct piece of equipment ensures safety and efficiency.
How Do Geologists Use a Hammer for Fossil Extraction?
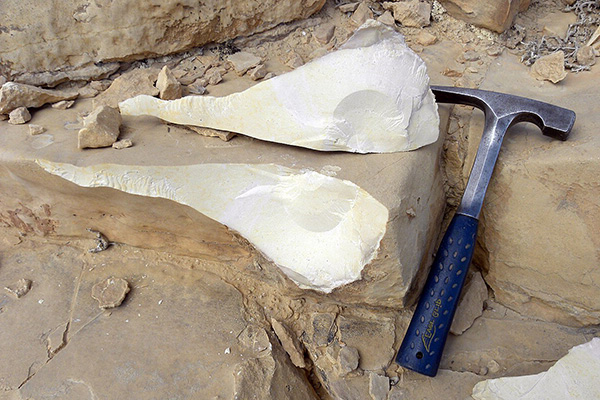
Extracting fossils requires care, precision, and the right tools, with the geological hammer playing a key role. The technique depends greatly on the type of rock (matrix) and the fragility of the fossil. Often, fossils are found in sedimentary rocks like shale, limestone, or sandstone. If the fossil is embedded in relatively soft or layered rock, the chisel end of a geological hammer is invaluable. Geologists use the chisel end to carefully chip away the surrounding matrix, working parallel to the bedding planes if possible. This allows for controlled removal of layers of rock without directly impacting the fossil. Gentle taps with the hammer are often sufficient.
For fossils in harder rock or when more matrix needs to be removed, the pointed tip of a rock pick might be used initially to create purchase points or to carefully outline the specimen, followed by work with smaller chisels or probes. The flat face of the hammer can be used to strike these smaller chisels gently for precision work. Sometimes, the pointed end itself can be used very delicately to scrape or pry away small bits of matrix, especially for defining the edges of the fossil. Using the pointed end requires a steady hand and a good understanding of how the rock might fracture. The goal is always to extract the fossil with minimal damage.
It's crucial to remember that the hammer itself is often used indirectly when extracting delicate fossils. Instead of striking the rock near the fossil directly, the geologist might use the hammer to strike a chisel placed strategically some distance away, allowing the resulting fracture to propagate towards the fossil without direct impact. For very delicate specimens, especially plant fossils in shale, the chisel end of the hammer might be used like a small pry bar to gently separate layers after an initial crack is made. Sometimes, large blocks containing the fossil are removed using the hammer and chisels, and the fine work of extraction is done later in a lab setting with specialized tools. Patience and the appropriate hammer technique are key to successful fossil recovery. We ensure our hammers offer the balance and control needed for such detailed work.
Safety First: Proper Techniques for Using a Geological Hammer
Safety is paramount when using a hammer for geological work. Rocks can be unpredictable, and steel tools used improperly can cause serious injury. The most fundamental safety rule is to always wear safety glasses or goggles. Striking rock with a steel hammer inevitably sends small rock chips and potentially metal fragments flying. Protecting your eyes is non-negotiable. Wearing sturdy gloves is also highly recommended to protect your hands from sharp rock edges, abrasion, and blisters, as well as providing a better grip on the hammer.
Proper striking technique is crucial. Ensure you have stable footing before swinging the hammer. Aim your blows carefully, striking the rock squarely with the flat face whenever possible for general breaking. Avoid glancing blows, which are less effective and can cause the hammer to ricochet dangerously. When using the pointed end or chisel end for prying or splitting, be aware of where your hands and body are positioned relative to the potential path of the hammer or any dislodged rock fragments. Never swing the hammer towards yourself or others. Always check your surroundings to ensure no one is within striking distance or in the path of flying debris.
A critical safety rule is never use a hammer to strike another hammer or any hardened steel tool not specifically designed to be struck (like the hardened face of an axe or sledge hammer). Striking hardened steel against hardened steel can cause one or both faces to chip or shatter explosively. If you need to use a chisel or wedge, ensure it is made of appropriate steel (slightly softer than the hammer face or designed for impact) and use the flat face of your geological hammer or a club hammer/sledge hammer to strike it. Regularly inspect your hammer for signs of damage, such as cracks in the handle, chips on the striking faces, or a loose head (if not a single-piece design). Discontinue use immediately if the hammer is damaged. As manufacturers, we build safety into our designs, but responsible use by the geologist is essential.
Maintaining Your Investment: How to Care for Your Geological Hammer
Proper care and maintenance will significantly extend the life of your geological hammer and ensure it remains a safe and effective tool. After each field trip, clean your hammer. Remove any mud, dirt, or rock dust, paying attention to the striking faces and the area where the handle meets the head (if applicable). A stiff brush and water are usually sufficient. Thoroughly dry the hammer afterwards, especially if it's made of steel, to prevent rust. Applying a light coat of oil to the steel surfaces can provide additional protection against corrosion, particularly in humid environments or if storing the hammer for extended periods.
Regularly inspect the striking faces (the flat face and the chisel or pointed tip). Minor scratches and scuffs are normal, but look for any signs of chipping, mushrooming (where the metal spreads out over the edge), or cracking. If the face becomes significantly mushroomed, it can become brittle and prone to chipping, creating a safety hazard. Minor mushrooming can sometimes be carefully dressed (filed smooth) with a metal file, ensuring you maintain the original bevel and don't overheat the metal. However, if significant damage is present, it's often safer to replace the hammer. Never attempt to re-harden or weld a damaged hammer head, as this compromises the steel's integrity.
For hammers with non-steel handles, check their condition regularly. A wooden handle should be checked for cracks, splinters, or looseness where it meets the head. Applying linseed oil occasionally can help preserve the wood. Fiberglass handles should be inspected for cracks or fraying. Even the grips on solid steel hammers (like the Estwing vinyl grip) should be checked for tears or looseness that could affect your hold. Secure storage is also important; keep your hammer in a dry place, preferably with a protective sheath over the head if available, to prevent damage to the edges and accidental injury. Taking these simple steps will ensure your geological hammer serves you well for many years. This durability is something our clients value, and proper care maximizes that investment.
Sourcing Quality: What to Look for in a Geological Hammer Supplier
For professionals, educators, retailers, and serious enthusiasts, sourcing high-quality geological hammers from a reliable supplier is crucial. As Allen, representing a factory specializing in hammers and axes, I know what discerning buyers like Mark Thompson look for. First and foremost is quality. This starts with materials – insist on forged steel heads, preferably high-carbon steel, known for its strength and durability. Check if the hammer is made from a single piece of steel, especially for premium models like Estwing style hammers, as this enhances safety and longevity. The heat treatment of the striking faces is also critical for resisting chipping and wear.
Beyond the basic hammer, look for suppliers who understand the nuances of geological tools. Do they offer both rock pick (pointed tip) and chisel end varieties? Do they provide different hammer weight options (e.g., 14 oz, 22 oz) and potentially handle variations (steel, fiberglass, shock absorption grips)? A good supplier can cater to specific needs, whether it's a lightweight hammer for students or a heavy-duty hammer for professional fieldwork. Ask about compliance with international safety standards (like ANSI or DIN). Reputable manufacturers conduct rigorous testing (impact tests, hardness tests) and should be transparent about their quality control processes. This addresses Mark's key concern about quality inspection.
Communication and reliability are also vital, addressing Mark's pain points. Look for suppliers with responsive and knowledgeable sales teams who understand the product technically, even if the buyer isn't a technical expert. Clear communication about specifications, lead times, logistics, and payment methods is essential. Reliable shipping and adherence to delivery schedules prevent costly delays. Furthermore, verify certifications; ask for documentation and, if possible, third-party verification to avoid certificate fraud. Choosing a supplier with a proven track record, perhaps one exhibiting at industry trade shows (a common way Mark finds suppliers), and one committed to quality materials like forged steel and transparent processes, ensures you receive geological hammers that are safe, durable, and fit for purpose. We strive to be that reliable partner for businesses worldwide, providing the quality hammer tools they need. Check out our range of Machinist Hammers or specialized Ball Pein Hammers for related quality striking tools. Or consider our heavy-duty Sledge Hammers for related heavy striking applications.
Key Takeaways on Geological Hammers:
- Specialized Tool: A geological hammer (rock hammer/rock pick) is essential for geology and fossil hunting, designed specifically to break rocks, split layers, and extract samples safely.
- Types Matter: Choose between a pointed tip (rock pick) for probing and hard rocks, or a chisel end for splitting sedimentary layers and fossil work.
- Weight is Key: Hammer weight (commonly 22 oz) balances power and fatigue. Lighter for precision/soft rock, heavier for general use. Consider a sledge hammer only with a chisel for very heavy work.
- Quality Construction: Prioritize hammers made from a single piece of forged steel for maximum durability and safety. Avoid using inappropriate tools like a claw hammer.
- Safety First: Always wear eye protection and gloves. Use proper striking techniques and never strike one hammer against another hardened steel tool.
- Maintenance: Keep your hammer clean, dry, and inspect it regularly for damage to ensure longevity and safe operation.
- Sourcing: Choose suppliers who offer proven quality (forged steel, proper heat treatment), clear communication, reliable logistics, and verifiable certifications.
Post time: 04-22-2025